Revealed: A DIY indoor hydroponic system for beginners you can build in about 5 square feet.
A DIY hydroponic system used to sound like a science fair project.
Tubes. Loud pumps. Timers. Leaks.
The kind of “fun hobby” that turns into an expensive, abandoned mess in your spare room.
But if what you really want is this:
- fresh greens you grew yourself
- a setup that fits on a shelf
- no pump noise, no plumbing
- something you can build on a weekend
- a setup cost that’s often under $100
…then you don’t need a complicated rig.
You need a simple indoor food system that quietly works in the corner of your home.
That’s what I’m going to teach you how to build.
Hi! I’m Tyler Brown and since 2019, I’ve been growing food in small spaces and teaching others how to do the same. I build what I call “mini farms” that grow nutrient-rich greens vertically so they’ll fit into a corner in your home. This system is cheap, effective, and easy to fit into your life.
If you want the “one shelf salad” version of this, read this next:
Grow Food Indoors: The 1-Shelf Salad Plan
And if you want to understand exactly how the passive water system works before you build it, our Kratky method beginner’s guide walks you through the science, the setup, and how much you can earn from it.
The easiest DIY hydroponic system for beginners (1 shelf, 5 square feet)
Here’s the core idea:
If a plant has water, nutrients, and light, it doesn’t care how fancy the container is.
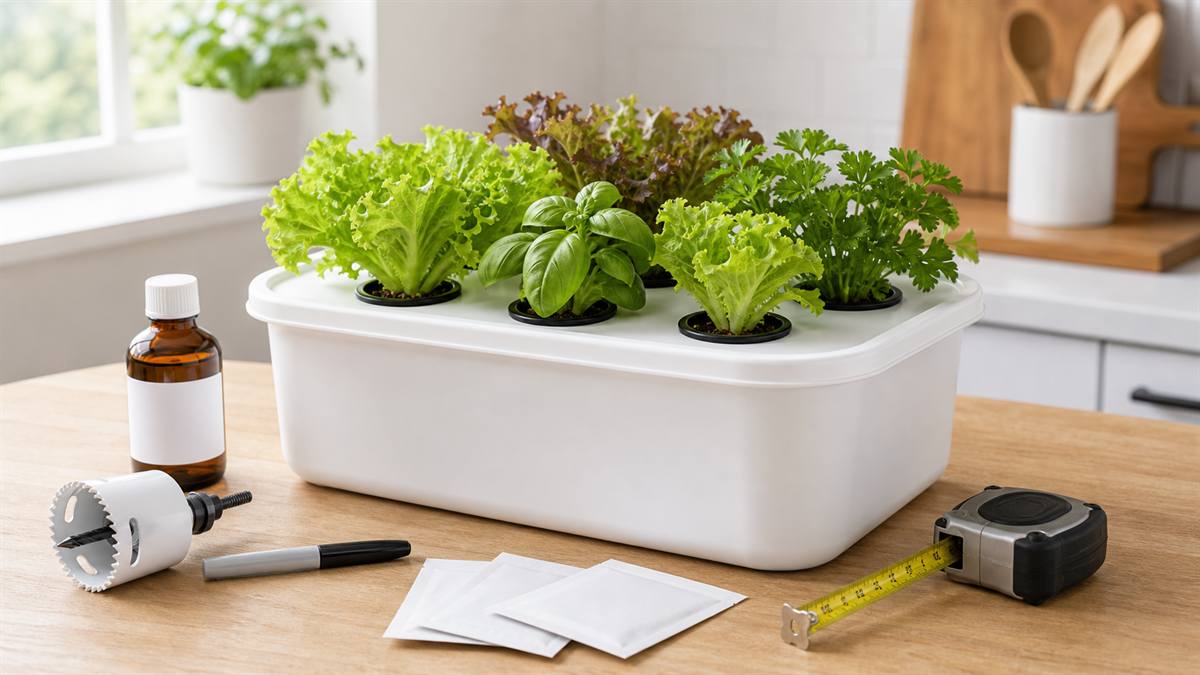
So instead of pipes and pumps, I use shallow storage totes as mini farm beds.
Each tote becomes a tiny indoor food garden:
- the lid has holes for net cups
- the cups hold a starter plug (growing medium)
- the tote holds nutrient water
- roots grow down, leaves grow up
- a light sits above it on a shelf
No pump.
No plumbing.
No loud humming in your house.
This is beginner-friendly because it has fewer parts.
And fewer parts means fewer failures.
Why most “beginner hydroponics” guides feel overwhelming (2 extremes)
When you search “DIY hydroponic system for beginners,” you usually see two extremes:
Extreme #1: High-tech countertop kits (pretty, pricey, small)
- sleek design
- apps and reminders
- pods and refills
- high cost
- not much food output
Extreme #2: Complex DIY builds (PVC, pumps, tools)
- pipes and fittings
- pumps and timers
- air stones and tubing
- lots of parts
- lots of ways to leak
If your goal is real food in a small space, both extremes miss the point.
Most people don’t need “smart.” They need simple.
Cheap DIY hydroponic system cost breakdown (real numbers under $100)
Prices vary, but this is the real starter math for a pump-free shelf setup.
1) Totes (2–4 mini farm beds)
- 2–4 shallow opaque totes (shoebox size works great)
Approx cost: $1–$5 each
Starter total: $5–$20
2) Net cups + starter plugs (for seeds)
- net cups sized for your holes
- starter plugs or an inert seed-starting medium
Approx cost: $10–$20
3) Nutrients (leafy greens mix)
- one basic nutrient set for greens
Approx cost: $15–$25
4) Light (simple, not fancy)
- an LED bar or shop-style grow light
Approx cost: $25–$40
Starter total (typical)
If you start small, many people land around: $50–$90 to get going.
After that, your recurring cost is mostly seeds. And seeds are cheap.
If you want a complete walk through, you’ll find one in my comprehensive guide the Indoor Mini Farm System.
DIY indoor hydroponic system starter parts list
If you want the shortest shopping list to launch your indoor hydroponics journey, start here:
- Shelf (any sturdy shelf works)
- 2–4 shallow opaque totes
- Net cups + starter plugs
- Nutrients for leafy greens
- LED grow light + timer
- Seeds for fast greens
That’s enough to start growing food indoors.
If you want to shop without wandering into a maze of pumps and gadgets, use the complete indoor hydroponic parts list. It separates the eight things you need from the equipment that can wait.
How to build a pump-free hydroponic system
Step 1: Pick the shelf spot (near an outlet)
I recommend putting it somewhere you can keep an eye on it, especially when you’re just getting started.
Step 2: Set your totes on the shelf (2–4 bins)
Start small. You can always add more.
Step 3: Cut holes in the lids
You want space for leaves to spread, so don’t pack holes too close. I usually make 5–9 holes in a plastic shoebox.
Step 4: Add net cups + starter plugs + seeds
Step 5: Fill the tote with nutrient water
Step 6: Hang the light above the shelf
Planting everything once is a project.
Staggering plantings is a system.
If you want the “done-for-you schedule” so you you’re running your mini farms on a system, grab a copy of the Indoor Mini Farm System.
What to grow in a beginner indoor hydroponic system (fast greens + herbs)
Beginners often try to grow everything they like to eat. They’ll start tomatoes, peppers, strawberries and more. Then they get frustrated. The reality is anything that bears fruit is going to take more nutrient focus that’ll take some trial and error in most setups.
Start with what wins fast:
Leafy greens (easy, quick, forgiving)
- cut-and-come-again heirloom lettuce
- bok choy
- tatsoi
- chard
- kale (baby leaves)
Herbs (high value, great for “wow” factor)
- basil
- cilantro
- parsley
These crops are great because:
- they’re productive even in small spaces
- they don’t need pollinators
- you can harvest leaves and keep going
- they replace the stuff that wilts fastest in the fridge
🌿 Free: 3 Hydroponic Superfoods That Grow Faster Than Your Rent
Find out which greens I grow first in every new mini farm — and why they’re worth more than grocery store lettuce. Free when you join the community.
🔒 No spam. Unsubscribe anytime.
What living with a DIY hydroponic system in your kitchen is like
This is the part people don’t believe until they try it, but this diy hydroponic setup is so easy! A pump-free tote system is quiet, and you’ll have no clogged filters or hose drama.
Without soil, you’re unlikely to have bugs or other pests. Growing food indoors means you’re not batting rabbits to keep your greens safe.
A simple weekly rhythm for steady harvests from your DIY hydroponics system
Pick the two days that work best for you.
Day 1 (5 minutes):
- check the water level and top it off if needed
- quick leaf check (if plants are stretching, lower your light)
Day 2 (10 minutes):
- harvest greens
- start seeds for the next tote (if it’s time)
That’s it.
When it’s this simple, you don’t “fall off.”
You just keep going.
DIY hydroponic system vs countertop kit (food output vs cost)
Countertop kits are fun, but they’re often:
- expensive for the space you get
- locked into pods or refills
- too small to cover much of your grocery bill
A tote shelf system is different:
- you control the size
- you control the crops
- you can expand one tote at a time
- you’re not locked into subscriptions
If your goal is real food, DIY hydroponic systems win.
How to scale an indoor hydroponic system into mini farms
You don’t have to sell anything, but once you have steady harvests, you may notice:
- “We can’t eat all this.”
- “My friend keeps asking for one.”
- “Could this cover a bill if I scaled it?”
That’s where “Profitable Homesteader” comes in.
A shelf system to grow food indoors offers:
- food security
- grocery savings
- and yes, optional side income
It’s why I walk people through the system I call “mini farms”:
- build identical totes
- plant them on a schedule
- offer extras as ready-to-harvest mini farms to your neighbors
I cover the basics (how to size, schedule, and keep it simple) inside the Indoor Mini Farm System.
Your next step to DIY hydroponic success
If you’re tired of:
- buying sad greens in plastic boxes
- telling yourself “someday I’ll grow food”
- feeling like hydroponics is always too expensive or too complicated
Start here:
One shelf.
A few totes.
A light on a timer.
Some seeds.
Which DIY hydroponic system is best for a beginner?
For most beginners, the best first system is a passive Kratky tote: an opaque container, a lid with net cups, nutrient solution, and a grow light. It is cheaper and quieter than a pumped system, and it removes the tubing, timers, air stones, and moving parts that cause most first-build problems.
| System | Typical starter cost | Maintenance | Best for |
|---|---|---|---|
| Kratky tote | $50–$90 | Low | First-time growers, lettuce, herbs, small spaces |
| Countertop kit | $80–$250+ | Low to medium | Convenience and appearance; smaller harvests |
| Deep-water culture | $70–$150 | Medium | Growers comfortable monitoring pumps and air stones |
| PVC/NFT build | $120–$300+ | High | Experienced growers who want a larger project |
If your goal is to learn hydroponics without spending a lot or troubleshooting equipment, start with one tote. You can add identical totes after the first crop succeeds.
The minimum viable beginner build
You do not need a full shelf on day one. The smallest useful test build is:
- one opaque 3–5 gallon tote with a lid
- four to six 2-inch net cups
- starter plugs for the seedlings
- a leafy-greens hydroponic nutrient
- a full-spectrum LED grow light on a timer
- lettuce or basil seeds
Start with one crop and one nutrient recipe. Mixing several crops with different needs makes it harder to tell what went wrong.
Four beginner mistakes that matter more than the container
1. Filling the tote too high after roots develop
Young seedlings need the solution close enough to reach. Established plants need an air gap beneath the net cup so part of the root system can breathe. The water level should fall as the plant grows. See the Kratky water-level guide for the stage-by-stage levels.
2. Using a clear container
Light reaching the nutrient solution encourages algae. Choose an opaque tote or completely cover a clear container before planting.
3. Starting with fruiting crops
Tomatoes, peppers, and cucumbers need more light, space, support, and nutrient management. Lettuce and herbs give beginners faster feedback and a much better chance of completing the first grow.
4. Changing several things at once
If growth looks wrong, check the simple variables first: water level, nutrient strength, pH, light distance, and temperature. Change one variable, record it, and give the plant time to respond.
Your first-grow checklist
- Choose one opaque tote and confirm it fits beneath your light.
- Cut four to six evenly spaced holes for net cups.
- Start lettuce or basil in clean starter plugs.
- Mix nutrients according to the label; do not make the solution stronger to speed growth.
- Set the light on a consistent timer.
- Check the water level and leaves twice a week.
- Record the planting date so you know whether growth is actually slow.
That simple build answers the most important question before you spend more money: whether you enjoy living with an indoor hydroponic system. If you do, scaling is just a matter of repeating a system that already works.
FAQs about DIY hydroponic systems for beginners
Can beginners really build a DIY hydroponic system?
Yes. Beginners do best with a pump-free setup because there are fewer parts to break. If you can follow a simple checklist, you can build a small indoor system on a shelf and start growing greens without plumbing or loud equipment.
What is the cheapest DIY hydroponic system to start with?
A pump-free tote system is often one of the cheapest ways to start. You can begin with 2–3 totes, net cups, nutrients, a basic light, and seeds. Many people can start around the $70–$95 range depending on what they already have.
Do I need a pump for an indoor hydroponic system?
No. Many indoor greens grow well without pumps. A pump-free system is quieter and simpler. That’s why it’s beginner-friendly. You still need light and nutrients, but you don’t need plumbing or moving parts.
What’s the easiest food to grow in hydroponics for beginners?
Leafy greens and herbs. Lettuce, bok choy, tatsoi, basil, and cilantro are popular because they grow well in small containers and don’t need pollination. They also give fast wins, which helps beginners stick with the system.
How much space do I need for a DIY indoor hydroponic system?
You can start in about 5 square feet with a small shelf. The goal is to grow up, not out. A compact setup is easier to maintain, easier to light, and easier to keep consistent.
About the Author
Tyler Brown runs ProfitableHomesteader.com, a site dedicated to sharing side hustle ideas at home – including how he builds tiny indoor mini farms, growing heirloom greens in plastic totes and selling them to local families.
After years of testing containers, crops, and pricing, he built the Indoor Mini Farm System so regular people could skip the trial-and-error and start growing real food (and side income) on a single shelf.
If you’re ready to set up your own pump-free mini farm and start growing food indoors without wasting money on gadgets, you can get the step-by-step guide here: